
Education
Setting Up Google Search Console and Adding a User
Unlock the full potential of your website with our simple and straightforward guide to setting up Google Search Console. Whether you're a business owner, a blogger, or just starting out, our step-by-step instructions will help you verify your domain and start tracking your site's performance in no time. No technical jargon, no confusion – just easy-to-follow directions that will get you on the right track to understanding and improving your search engine presence. Discover how to verify your site without touching a single line of code, add your trusted web design team, and begin optimizing for better visibility. Get ready to make your website work smarter with Google Search Console!

What You Will Need:
- A Google account (If you don’t have one, you’ll need to create it.)
- Access to the account where your domain name is registered (like GoDaddy, Namecheap, etc.)
Step 1: Sign Into Google Search Console
- Go to Google Search Console and click on "Start now."
- Sign in with your Google account.
Step 2: Adding Your Website to Google Search Console
- Once signed in, look for a button or link that says 'Add property' or 'Start now'.
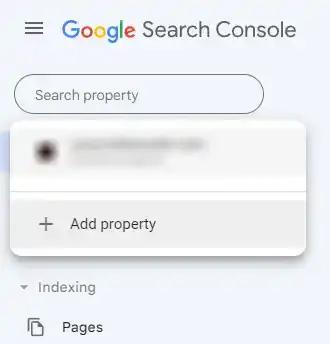
- Select 'Domain' and enter your website's domain name. (For example, enter "mywebsite.com" without the "www" or "http://".)
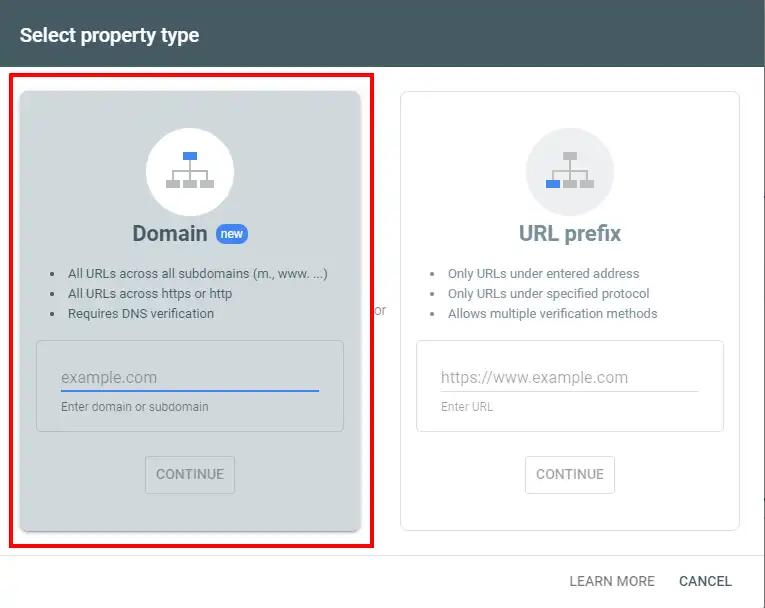
- Click 'Continue'.
Step 3: Verify Your Domain
- Google will provide you with a TXT record. This is a line of text that you’ll need to add to your domain’s DNS records as proof of ownership.
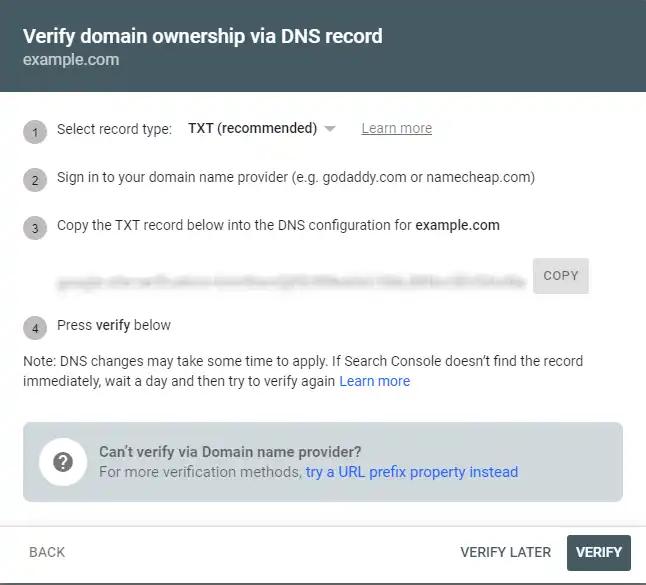
- Log into the website where you registered your domain. This might be called your domain provider or domain registrar. For example, Google Domains, GoDaddy, Wix, etc.
- Find the section for managing DNS settings. It might be labeled as 'DNS Management', 'Name Server Management', or 'Advanced Settings'.
- You'll want to add a new DNS record, specifically a TXT record: Please note that changes to DNS records can take some time to propagate across the internet, sometimes up to 48 hours.
(If you need help with this step, reach out to us at Jamsurface.io)- There may be an 'Add' button or a 'New Record' button to click.
- Select 'TXT' as the type of record you’re adding.
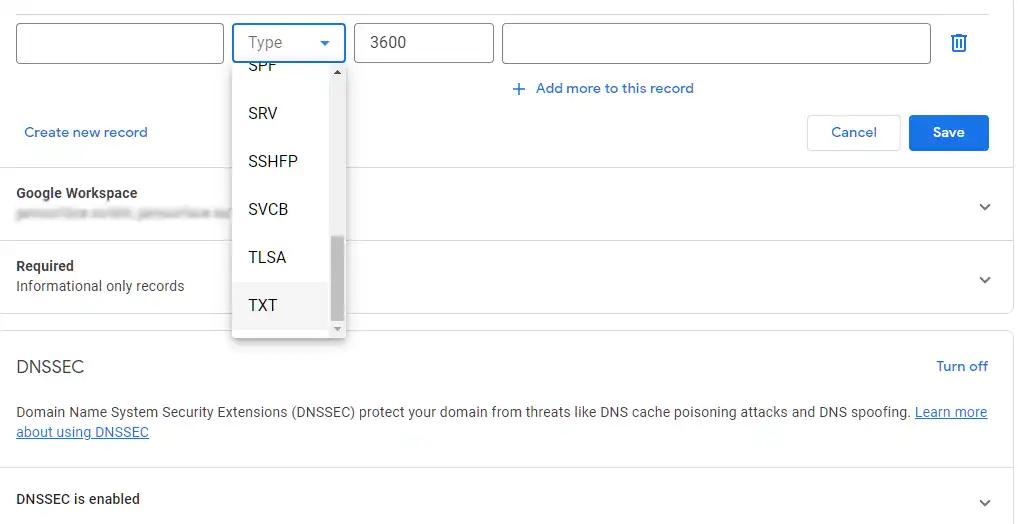
- In the 'Name' or 'Host' field, you can enter "@" or leave it blank if required by your domain provider.
- In the 'Value' or 'Content' field, paste the TXT record provided by Google.
- Save or add the record.
Step 4: Inform Your Web Design Company
- After adding the TXT record, reach out to your web design company to let them know you’ve completed the step.
Step 5: Add Your Web Design Company to Google Search Console
- Go back to Google Search Console once your domain provider has updated the DNS records.
- Click on 'Settings', then go to 'Users and permissions'.
- Select 'Add user' and enter the email address of your web design company.
- Choose the permission level 'Full' to give them the ability to manage the Search Console settings for you.
- Click 'Add'.
Step 6: Confirmation and Next Steps
- Your web design company will now verify the setup by clicking 'Verify' in Google Search Console and can start managing your search presence.
You’re All Set! With these steps, you’ve connected your website to Google Search Console without needing to touch any code on your website. This connection will help you understand how Google views your website and allows your web design company to optimize your site’s visibility in search results.
From the JamSurface journal. We help small businesses with website design, development, and ongoing support.
Get to know the studio → Explore our client projects →